One Year Anniversary of the Winterset Tornado 3-5-22
On the one-year anniversary of the EF-4 tornado that struck PepperHarrow Flower Farm in Winterset, Iowa, we reflect on the harrowing experience. The tornado, which hit on March 5th, 2022, left a trail of destruction, impacting lives, the local community, and our beloved flower farm. Read our firsthand account of the events, the resilience of the community, and the ongoing recovery efforts. #WintersetStrong
Today marks the one-year anniversary of the EF-4 tornado that hit our flower farm in Winterset, Iowa, on March 5th, 2022. The tornado left a trail of destruction in its wake, and caused loss of lives, widespread damage throughout our neighborhood, greater Iowa community, and to our beautiful flower farm.
Both of our cell phones received an audible alert around 4:00PM that we were under a tornado warning. We were working outside in the greenhouse in the backyard of our home at the time, but when we received that alert we knew that it meant that a tornado was imminent. However, it was strange to receive the alert, because there wasn’t a cloud in the sky and the weather was absolutely perfect. It was 70 degrees and sunny, but we would soon find out how deceptive the weather could be.
Our son’s 15th birthday was that day. He had invited over four of his friends to spend the evening with him in our event barn, setting it up to play video games with his friends for his birthday. When the alerts went off on our phones, the boys came milling out of the barn, looking inquisitive about what they should do. We told them immediately to go into the house until we could make sure it was safe for them to return to the barn to carry on with birthday party festivities.
Around 4:20PM, bored from staying inside, the boys asked Adam if they could return back to the barn and Adam allowed them to go back out, but he stayed outside and kept an eye to the west for a several minutes to make sure everything was going to be safe. By that time, the storm front was starting to move in and the clouds were starting to look ominous.
Keeping a watchful eye to the west, Adam began to see rotation of the clouds 4:32PM. Luckily, one of the kids’ parents had just been out to drop something off for one of the boys and he happened to be walking by when Adam saw the rotation in the clouds. He told the boy to go get the others and tell them to get into the house immediately, because there was a tornado.
The boys came running out of the barn, over to where Adam was standing, looking to the west, and saw the tornado dropping out of the clouds. They froze in place for a few seconds before Adam snapped harshly at them to run into the house and get into the basement. It was 4:34PM at that time and the tornado was beginning to grow in size.
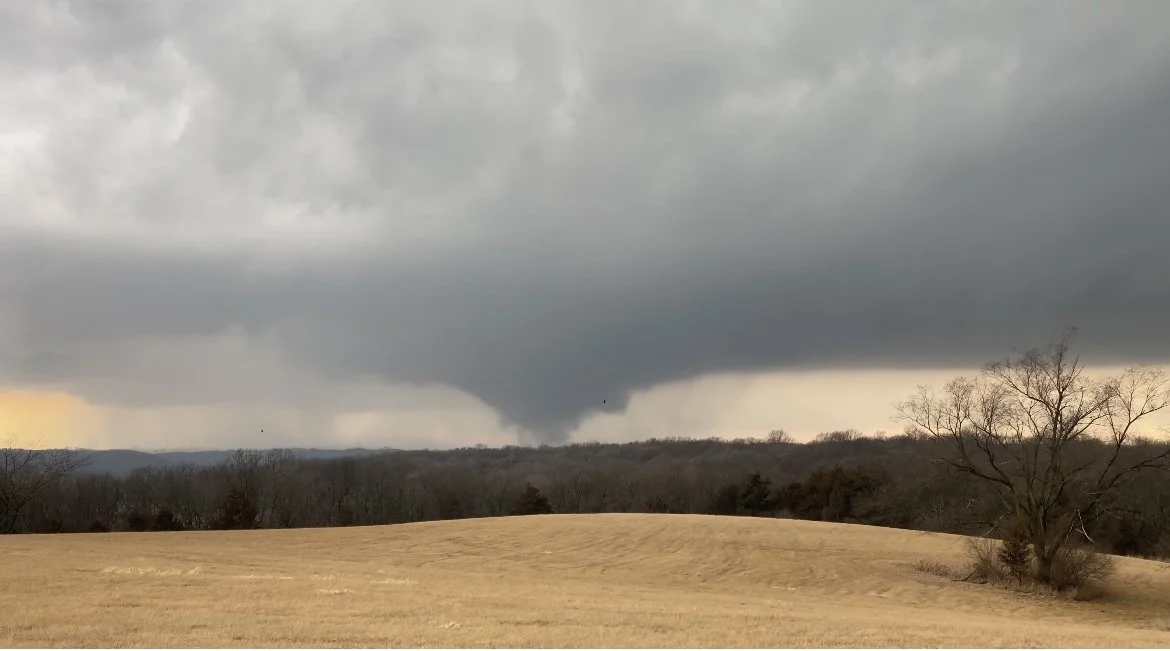
While Jenn, our son and his friends, and our daughter Quinlan huddled in the basement of our home, Adam stayed outside, took further video for the tornado, and watched in disbelief as the tornado approached the farm for a direct hit. Adam’s last video of the tornado as it came closer to the farm was timestamped at 4:38PM, below.
Adam quickly ran into the basement and told us that we needed to prepare ourselves for a direct hit - that the tornado was coming straight for us. We instructed the boys to cover their heads just like the learned in school and we began to pray to God aloud.
We could hear the ferocious roar of the tornado approaching us, debris hitting the house in what sounded like mud hitting your car when you get stuck in mud on the road, the crashing sounds of windows breaking and trees falling all around us.
High winds could be heard hitting our house and our house gave way to a loud cracking sound, almost as though 2X4s in the walls were snapping. Wind blew into the basement and dust hit our faces as we huddled together. It felt like the house was being sucked up and off of its foundation. There was a split second during all of this chaos when Adam said there was a feeling of “either the house was going to go or stay” and said at one point that he was preparing himself during that time to dive onto the top of all of us to protect us.
All of our ears were popping, just like when taking off on an airplane, but with 1,000X more intensity as the pressure from the tornado went right over the top of us. We found it hard to breath as the pressure pressed down on us for the few seconds it took for the tornado to pass over.

From the end of this video, taken at 4:34PM to the time the tornado hit our farm was about 60 seconds
Then everything was absolutely still and quiet.
Adam walked upstairs and instructed everyone to stay where they were and not move. He needed to assess the damage and what we would be dealing with. At that point, we thought maybe a part of our house was gone and that we would be walking upstairs to nothing being there.
At 4:45 Adam called Jenn upstairs to see the damage. Luckily the house itself was still standing with just a small amount of damage, but everything else around the house and around the flower farm was obliterated.
We stepped out of the house and took our first video of the damage at 4:47PM.
Adam told our son’s friends to call their parents and let them know they were safe and asked them to have their parents come pick them up. Little did we know that our driveway was blocked by a large downed tree, which Adam had to push out of the way to get the parents into our property.
Worried about our 9 cats who were all outside during the tornado, our daughter searched for them around the farm and in the wreckage, not finding any during her search.

Time stamp on video 4:47PM
The boys and their parents started helping us gather a few items from our event barn that had survived. Rain was coming in behind the storm and we were rapidly trying to salvage anything we could. Everything was stacked inside our living room and office area, because there was no other place to put these items.
Mud was everywhere. There was no electricity and we found that the tornado had pushed water back up into the pipes. Our toilets were empty of water and we had to run the sink tap for 2-3 minutes before water started coming out again.
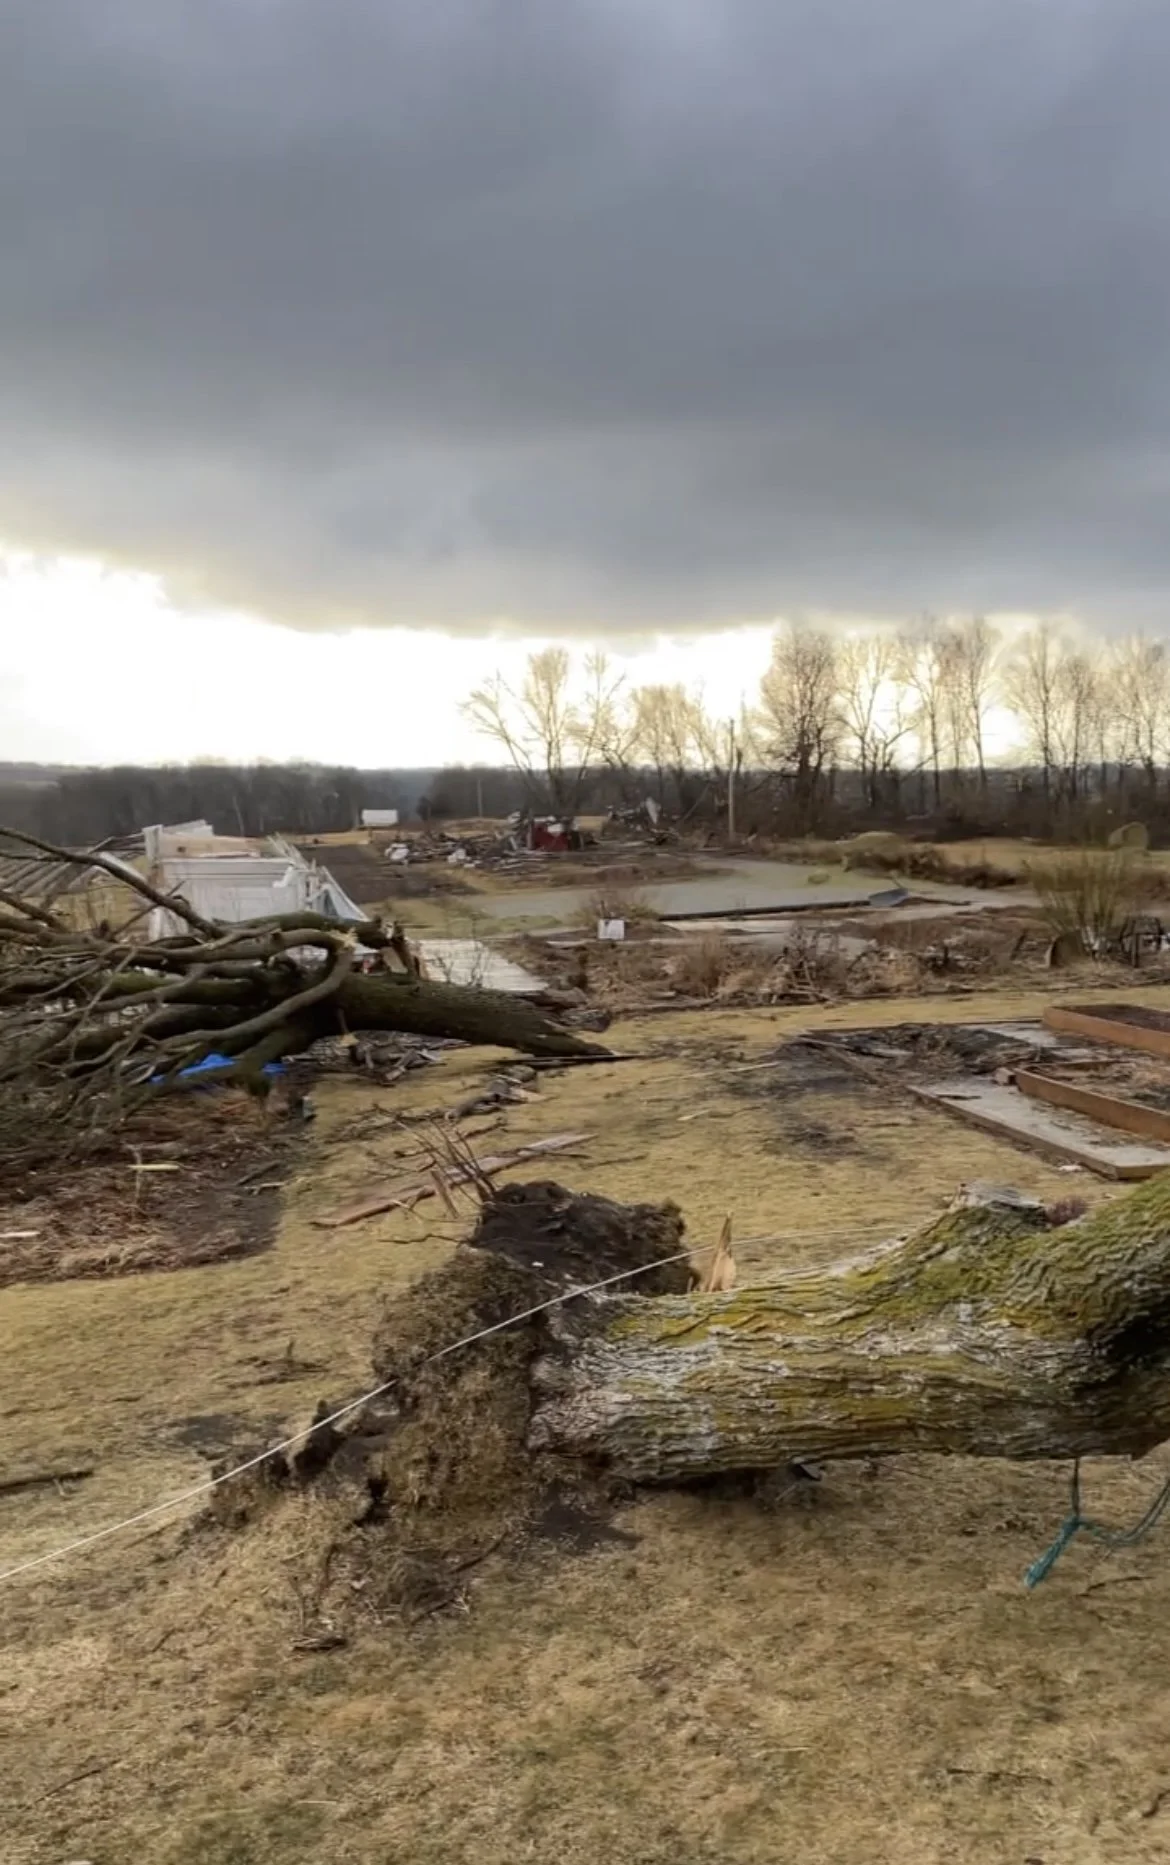
A view of the destruction to the Red barn and event barn area at pepperharrow
The first calls we made were to Jenn’s brother, Josh, who’s son had been at our property and to Jenn’s mom and dad who live in Winterset. All of them came out to see the damage and to help out. Josh was in disbelief and had to leave right away to help, because duty was calling. He works at Madison County Secondary Roads and needed to get the roads cleared to help first responders get to people on Carver Road. Jenn’s parents took our two kids and Josh’s son to their house to have a little normalcy as we gathered ourselves and tried to figure out next steps.

The ethereal sunset after the tornado
As we tried to calm ourselves and get some rest for the following day, the long, hard day full of clean up efforts we knew was coming, we laid in our bed, unable to fall asleep. Our minds kept replaying the events of the afternoon and we found ourselves too hyped on adrenaline to find the reprieve of sleep.
Eventually we did rest, but it was only for an hour or so. We roused ourselves around 6:00AM the next morning, pulling insurance policies, ordering PODS for storage and getting ourselves ready for a very long, and difficult day. We were incredibly mentally, physically exhausted and traumatized.
The first volunteer showed up at the farm around 7:00AM and people began to show up rapidly after that. We put a call out to our community through social media and by noon, there were over 200 people at the farm helping with cleanup.
We were walking around in a daze and didn’t have full control over our mental faculties to instruct people on what exactly what needed to be done, besides ‘clean up’, so it was incredible to have Dave Handsacker from the Pumpkin Ranch, another Madison County business, show up, take control and help direct people on what needed to be done. Thank you, Dave!
We couldn’t have done it without these amazing people! Their kindness and willingness to help us with cleanup was extraordinary and we cannot express how humbled we are by this. It was a long, hard day of work and these folks gave up their free time to help. God Bless all of you for all of your help!
For the next several days and weeks to come, volunteers from across the region also stepped up to help, donating their time, money, and resources to assist. The outpouring of support was heartwarming, and it helped to bring hope and comfort to us, after we had lost so much.

Pella boys football team helping with clean up at pepperharrow
Looking back over the the past year, ourselves and our neighbors have worked tirelessly to rebuild and recover from the tornado. Homes and businesses have been reconstructed, and many of our neighbors have been able to move back into their homes. However, there is still so much work to be done, and many people are still struggling to recover from the physical, emotional, and financial impacts of the tornado.
As we mark the one-year anniversary of the Winterset tornado, it is important to remember those who lost their lives and to honor the bravery and heroism of the first responders and volunteers who worked tirelessly to save lives and help those in need.
We’ve seen that tornadoes and other natural disasters like this can be devastating, but we’ve seen that they can also bring out the best in people. The way our community came together to support one another in the aftermath of the tornado was truly inspiring, and it serves as a reminder that we are all stronger when we work together. As we move forward from this tragedy, let us continue to support one another and work towards building stronger, more resilient communities not only in Iowa, but across the country. #wintersetstrong
XX Jenn and Adam
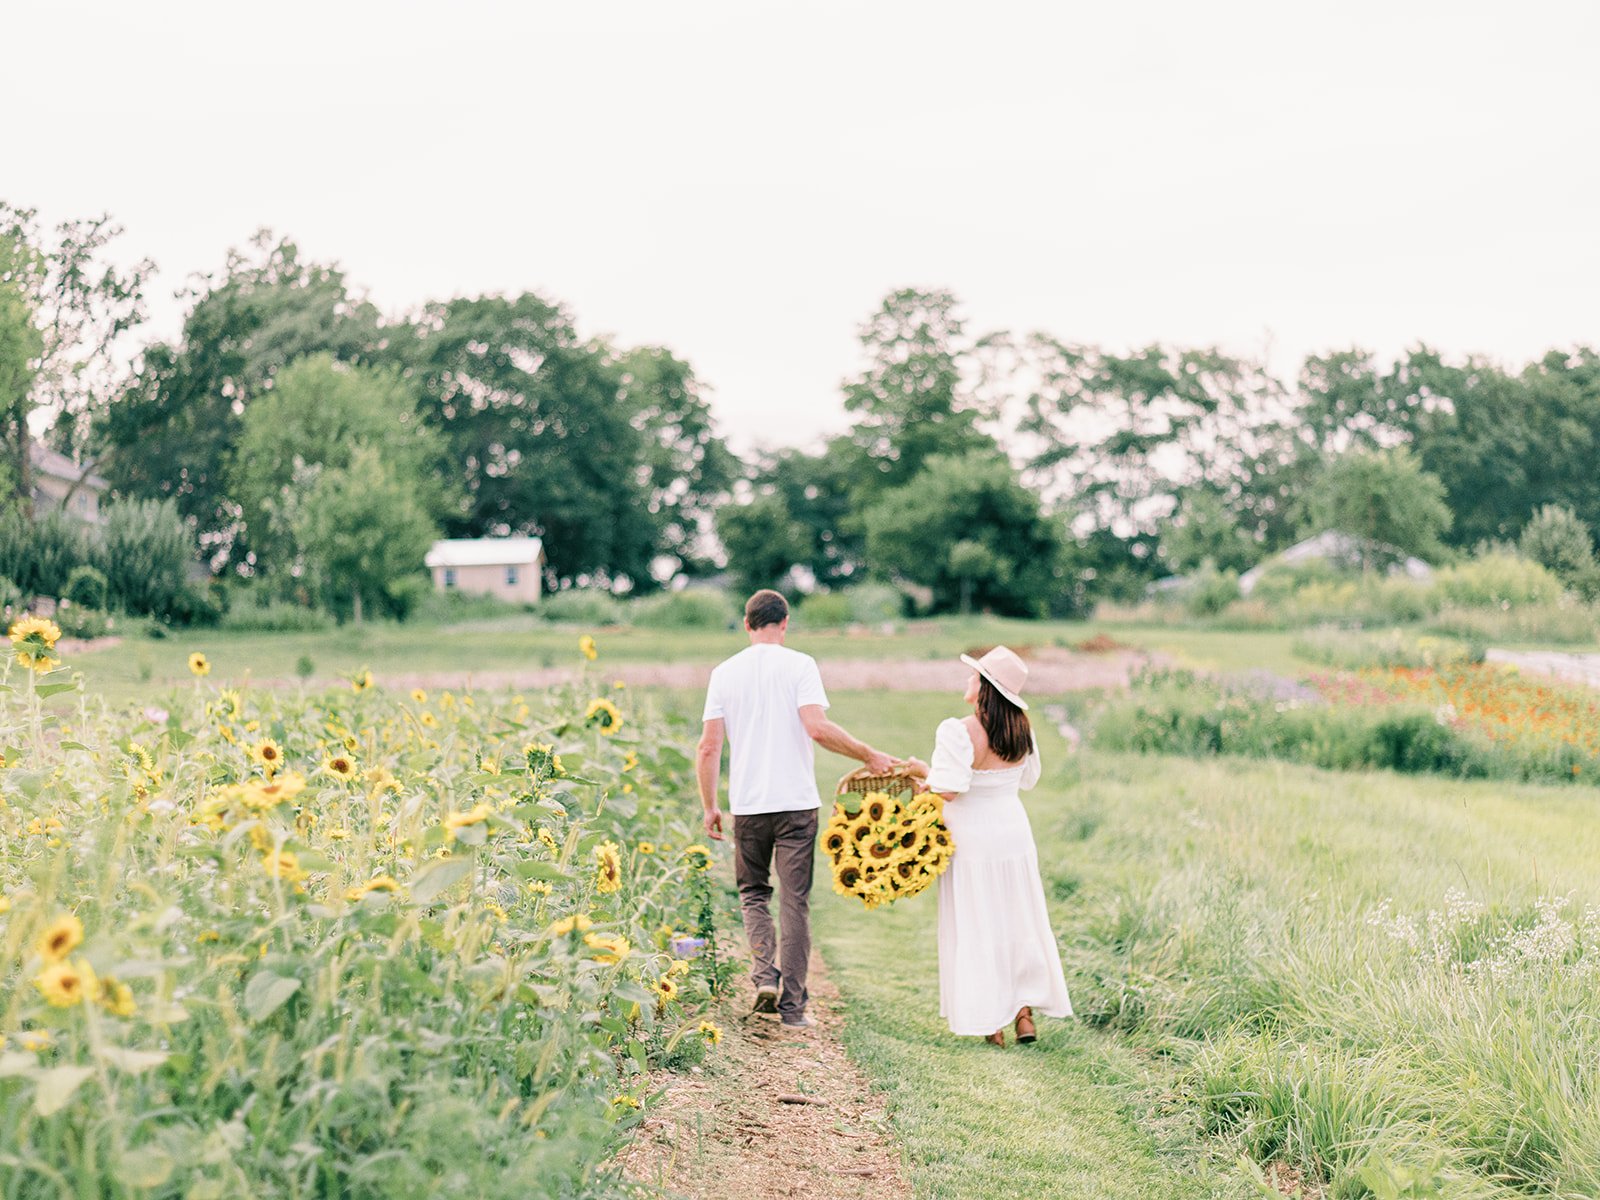
Growing Stock Flowers for Your Cut Flower Garden
Discover the world of stock flowers and learn the secrets to successfully grow them from seed. Explore recommended varieties like Iron Series, Katz Series, Cinderella, and Legacy, and follow our expert tips on seed starting, temperature control, and transplanting. Elevate your cut flower garden with the sweet fragrance and long-lasting blooms of these stunning stock flowers. #FlowerGardening #SeedStarting #StockFlowers
Stock flowers, also known as Matthiola incana, are popular cut flowers with us and other cut flower growers, due to their sweet fragrance and long-lasting blooms. Today, w’re going to share some of the best types of stock for cut flowers and share some of our seed starting secrets to grow stock from seed.
The very first step is to look for great types of stock to grow and to find a reputable source to buy them. In order to do that, you’ll have to look for high-quality seed from a reputable source, such as Johnny’s Select Seeds, Botanical Interests, or Burpee Seeds. There are several great varieties of stock to grow, but a few of our favorite types to grow for cut flowers are: Iron Series, Katz Series, Cinderella, and Legacy.

After you’ve selected the varieties you want to grow, it’s not time to get your seeds started! We usually start our stock seeds at the end of January or beginning of February in zone 5b, Central Iowa. Starting them early and getting them outside early will allow them plenty of time to establish before heat sets in.
In order to start your seeds, use either a 72 cell tray, recycled milk jug, or other seed starting container and fill it with seed starting medium. Sow your seeds in a sunny location, or under grow lights (for at least 10 hours a day). We do not bury our seeds 1/8” into the seed starting medium as recommended on most seed packets. We top sow the seeds to allow maximum germination. Keep the soil moist but not waterlogged.
Keeping your growing temperature between 60-70 degrees Fahrenheit is ideal for these seedlings. They don’t like to be too warm while they are germinating. If your sunny place is too warm, consider moving them back just a bit to not take on too much warmth. We recommend buying a digital temperature gauge to monitor your growing temperature.
Once you have your seedlings placed in their seed starting area, be sure to water regularly, keeping the soil consistently moist, but not waterlogged, until seedlings emerge. After your seedlings emerge, water only when the soil feels dry to the touch. After your seedlings are established, feed them with a balanced fertilizer every 4 to 6 weeks. They love just a bit of fertilizer to help them strengthen their growth.
Before we plant our stock seedlings into the ground, we harden them off. Starting on a day that isn’t too windy, we bring out seedlings outside for an hour, then bring back inside. Each day after that we leave them out for longer and longer until they are stiff to the touch. At that point, we know they are ready to be planted.
We plant our stock into either 9” or 6” spacing in our reusable fabric cover to help reduct weeds. The closer you plant them together, the taller the stems you will see. Also, as stock flowers grow, they may need support to prevent them from falling over. Use netting, stake them or use a cage to provide support.
By following some of our tips and tricks, you should be well on your way to growing beautiful and healthy stock flowers from seed!
XX Jenn and Adam

How to Start Sweet Peas from Seed
Discover the joy of cultivating sweet peas from seed with our concise guide. Choose top varieties, learn essential starting tips, and follow easy steps for successful planting and care.
How to Start Sweet Peas from Seed
Sweet peas are beautiful and incredibly fragrant flowers that are pretty easy to grow from seed. They come in a wide variety of colors, which makes them even more fun! If you're interested in growing sweet peas, starting them from seed, this blog post is for you.
The first decision you have to make is what type of seeds are you going to grow. This is the fun part! There are several great seed places to source great seed stock. We love sourcing sweet pea seeds from Renee’s Garden, Botanical Interests and Farmer Bailey the most, but there are many other places you can find great seeds to start with. All of these can be ordered online, or found at your local garden center. The trouble with selecting seeds is narrowing down the list of which ones you love the most. If you’re like us, you’ll want to grow ALL the colors.
Varieties We Grow
A few varieties we usually grow year after year are the Elegance series, which are great for cut flowers. We also love growing Blue Celeste, Royal Wedding, and Blue Celeste (from Renee’s). This year, we’re growing Rose Elegance, Charlie’s Angel, Frances Kate, and High Fragrance Mix. We picked these colors out specifically for weddings we’re providing flowers for in late May and into Mid-June for a fun treat for our brides.
Once you have your seed varieties selected and seed packets in hand, it’s now time to think about starting them. If you read the seed packet, most say to start them 4-5 weeks before last frost, which is absolutely fine, but what we’ve found is that starting them that late doesn’t give us a ton of time to enjoy these blooms before our summer heat sets in and kills them off. With this in mind, we start our seeds in late January in order to have them planted outside by March 1st.
We’re located in zone 5b, Central Iowa for those of you wondering. It does get very cold during the winter months, but read on, we’ll address how to transition and plant them outside despite cold conditions, below, but first we need to talk about how to start these seeds to get them going.

Soak Your Seeds
Before you plant your sweet pea seeds in seed starting medium, you’ll need to soak them overnight in water. This will help to soften the hard outer seed coat and encourage germination. To do this, place your seeds in a bowl of water and let them soak for 12 to 24 hours.
Drain off all of the water from your seeds, using a strainer. and transition your seeds into a peat pot, recycled yogurt containers, old milk jugs, or a seed starting tray, filled with seed starting medium, which you can find at your local garden center. We like to use a 72 cell tray to start our seeds, because we generally start about this number of sweet peas each season.
Before placing seeds in the growing medium, make sure the medium is moist, but not soaking wet. Place your seeds on top of the seed starting medium and after all are set in place, push each of them 1/2” into the seed starting medium and cover. From here, place them in an area that has light exposure, but not direct sunlight. We like to pick a cooler, spot for them to germinate with temps around 60 degrees F. If kept at this consistent temperature, plants should emerge in 7-12 days.

We’re often questioned about why ‘pinching’ is necessary for sweet peas. It’s really important, because it helps your seedlings become stronger plants and it also helps promote branching (new growth) on the plant, which makes them even stronger before they go into the ground. They need to be pretty tough and well established before they can be transitioned out and planted in the ground.

Pinching Sweet Peas
Once your little seedlings have reached 6-8” tall and have formed at least 4 sets of leaves, plan on ‘pinching’ the top growth off of your little seedlings, leaving at least 4 sets of leaves on the plant. You can use your fingers to pinch off this growth, or you can use a pair of floral snips.

Why Pinch?
We’re often questioned about why ‘pinching’ is necessary for sweet peas. It’s really important, because it helps your seedlings become stronger plants and it also helps promote branching (new growth) on the plant, which makes them even stronger before they go into the ground. They need to be pretty tough and well established before they can be transitioned out and planted in the ground.
It’s almost time to plant your seedlings outside! We plant ours outside on March 1st, which we addressed above, now we’ll get to how we do this. Before we get to planting them, we’ll talk about the ‘hardening off’ process.
Hardening off is the process of transitioning your plants outside to prepare them to be planted. This process is necessary to toughen your seedlings to the elements of growing outside, such as directl sunlight and wind. After seedlings have been growing inside, in a controlled environment, they’re a little fragile. In order to transition them out to harden them off, bring them outside for an hour the first day to start, keeping them in a protected area out of direct sun and high winds.
From this point going forward, you’ll bring them outside each subsequent day for a longer period of time until you run you hand over the top of the plants and feel that they are stiff and strong, which is where the name hardening off comes from. Once you’re achieved this, your little seedlings are ready to be planted outside!
Your sweet peas are ready to plant, so not it’s time to prepare your planting area. Sweet peas prefer well-draining soil with plenty of organic matter. Choose a spot in your garden that gets plenty of sunlight, but with ample afternoon shade to keep them from overheating and prepare the soil by adding compost or other organic matter.
After your growing area has been prepared, add a small garden trellis in the middle of your planting area and plant your seedlings on either side, about six inches apart. Keep in mind that once your sweet pea plants have reached 12” of growth, begin to train them to grow up the trellis, by adding twine and plant stakes, gently weaving the vines around the twine.
Since we plant our sweet peas in the ground on March 1st, we give them a little frost cover protection with agribon to cover them during temps well before freezing, uncovering them during the day and for times when the temperature is at/above 32 degrees F.

Sweet peas need regular watering and fertilization to grow strong and healthy. Water them regularly, but be careful not to overwater as this can cause the seeds to rot. Fertilize your sweet peas with a balanced fertilizer once a month.
If you need this information in a bit different format, check out our YouTube video on How to Start Sweet Peas from Seed. Additionally, in the video description box, you can find links to all of the tools we use to grow sweet peas.
Sweet peas typically bloom in the spring and early summer. For us, they boom May through the end of June. We hope y’all enjoy the beautiful colors and fragrances of your sweet pea blooms and find a place to squeeze them into your garden year after year!
XX Jenn and Adam

Creating a Cutting Garden on a Budget
Create a budget-friendly cutting garden by choosing enduring flowers like zinnias and sunflowers, opting for cost-effective seeds, and exploring free alternatives for compost and mulch. Reuse old containers, and consider planting multi-functional blooms like lavender and herbs for added value. Embrace resourcefulness and creativity to cultivate a stunning cutting garden that brings joy all season long. Happy gardening!
Having a cutting garden allows you to enjoy a constant source of fresh cut flowers for your home, to use in arrangements for special occasions, or to gift to friends and loved ones to sprinkle a little joy into their lives. But starting a cutting garden can be a little intimidating, especially if you are on a tight budget. Here are some tips we’d like to share for creating a cutting garden for seasonal blooms that will help to not break the bank.
The first thing to think about is to choose flowers that are both easy to grow AND have a long vase life. Some good examples of flowers that fit both of these catagories include zinnias, sunflowers, celosia, cosmos, and rudbeckia. These flowers are not only beautiful, but they are also fairly easy to grow and generally have a long vase life. They’re some of our favs!

Attempt to start your flowers from seeds rather than buying already grown plants. Seeds are usually much cheaper than plants. With a little patience and care, you can grow a wide variety of flowers from seed. Just make sure to choose high-quality seeds from a good source. If you need seed starting tips, we have some great videos for several different seeds on our YouTube channel you can access here. Not only do we provide seed starting tips, but if you check the detail section, we provide sources for all of the seed starting supplies we use.

Utilize free or low-cost resources. Instead of purchasing compost or mulch, consider using free or low-cost alternatives, such as leaves, grass clippings, or wood chips from a local tree service. Also, consider checking with your local nursery, gardening club, or online plant swap/trade/giveaway sites for any seeds or division plants they may have available to share.
Reuse and recycle. Instead of buying new pots or containers, consider using recycled containers or items you already have on hand, such as old buckets, milk jugs or pots. You can also reuse old pots by sterilizing them and adding fresh soil. Some of our trays have been reused for over 11 years and are still going strong. Reduce and reuse whenever possible!

PepperHarrow Seeds
Our seeds from the farm generally are offered online in early January through the end of February each year. Included are customer favorites: Chester Copperpot, Starlight celosia and our Butterfly Garden Seed Kits.
Consider planting flowers that have multiple uses. Some flowers, such as lavender, not only look beautiful in arrangements, but they also have other uses such as drying, cooking, crafting, or flowers that are good for pollinators. Looking for flowers that cross all of these categories can help you get more value out of your cutting garden. Our favorite flowers for multiple uses include: lavender, sunflowers, strawflower, herbs, and pennycress. These may not hit each category, but we at least like to pick flowers that at least hit two different uses.

We hope that this has given you a few small tips to save a little money starting your very own cutting garden. By following tips, you can create a beautiful cutting garden without breaking the bank and you’ll have flowers to enjoy all season long. Happy gardening!
XX Jenn and Adam

Starting A Flower Farm in 2023
Embark on the rewarding journey of starting a flower farm in 2023 with these key steps: research the local market, create a comprehensive business plan, choose a strategic growing location, invest wisely in supplies, and start growing with care. Explore selling avenues like Facebook Marketplace and farmers markets, prioritizing visual presentation. Turn your passion into a successful business venture. Happy farming!
Starting a flower farm can be rewarding and fulfilling for those who love working with plants and flowers. We say it’s like living out our dream every day, no matter how hard it might be. However, before you begin your journey, we want to recognize that it’s important to do your research and plan out your path before diving in. In our recent book, Small Farm Big Dreams, we wrote about how to start a flower farm, but we want to follow up a give you a few more tips. Here are some steps we’d like to share to help you become a successful flower farmer in 2023!
Step #1 Research the market: Take some time to research the demand for flowers in your area and determine what types of flowers are most popular. You'll also want to consider what types of flowers grow well in your local climate and soil conditions. Is there a niche/gap in the market of something that’s not currently being offered where you could meet a customer need?
A Few Research Recommendations: Try to grow a few flowers of your own if you have not done so in the past. Scope out other local flower farmers and florists to see what their demand looks like, observe color combinations of flowers they put together. Buy a bouquet and attempt to do a price breakdown for each stem.

Step #2 Create a business plan: Once you have a pretty good feel on your local market, where your potential is for sales, etc., and what types of flowers you'll be growing, it's time to create a business plan. Your business plan should include details about your target audience, pricing, marketing strategies, and financial projections. Creating a business plan is NOT a bible, but it’s a great guide to help keep yourself on track during the start up process of your flower farming operation. It’s also a great tool to use for funding purposes, if you’re looking to secure money through a loan from a bank, small business loan, or other outside funding mechanisms.
Business Plan Tips: There are a lot of resources out there to help with this, including your local Small Business Administration. Tap into as many resources as you can. They are there to help! Here’s a quick link to US SBA, here. This link will help you get to local resources.

Step #3 Choose a flower bed location on your property and plan the layout: Selecting the right location for your flowers is crucial. Consider factors like access to water, sunlight, and infrastructure when choosing a site that would work best for growing flowers. We highly recommend taking a year to observe your property and see where possible locations for your flower garden/field might be. You'll also want to research any zoning regulations or permits that may be required to operate a flower farm in your area. These requirements vary for each state, city, and county.
Recommendation for selecting a growing area: our farm is not flat, but we use the slight slope to our benefit, because it does help with water drainage. It’s nice to find a nice flat spot for your flower fields, but it’s not a requirement. Almost always, you have to use what you have access to. If the area you’re looking at is too flat, we highly recommend hilling whenever possible to help with any potential water drainage issues that may arise with growing on a flat area, especially if you observe standing water during heavy rains.

Step #4 Purchase supplies and equipment: You'll need to invest in a variety of supplies and equipment to get your flower farm up and running. This list of items includes necessary items like seeds, pots, soil, landscape fabric (to grow flowers in) watering systems, and other tools (rakes, shovels, etc).
Pro-Tip: Start small with your up front investments. If you can getaway in year 1&2 with smaller investments, such as a tiller instead of a tractor, this will help make sure you can be scalable. Bottom line is that you don’t have to have all the fancy tools to be able to ‘make it’ as a flower farmer. There’s something to be said about bootstrapping and making what you have work for a temporary basis.

Step #5 Start growing: Once you have all the necessary supplies and equipment, it's time to start planting and caring for your flowers. This will require consistent watering, fertilizing, wedding, and deadheading to ensure that your flowers are healthy and productive.
Recommendations for growing flowers: Most of our flowers are planted in landscaping fabric with 9” between each plant. There are very few flowers we do not plant in fabric, but some that we sometimes think about not putting in fabric are: sunflowers and zinnias. Oftentimes we see that once our seedlings are established after translating, roughly 3 weeks in the ground, we are able to decrease our watering cycle depending on the weather.

Step #6 Sell your flowers: There are many different ways to sell the flowers you grow on your farm. We highly recommend having a place to sell your flowers before you grow them, which starts in step #1 and step #2 above. However, many new flower farmers we’ve had the opportunity to chat with have used their first years of growing flowers to simply give them away for others to enjoy, while they learn the ins and outs of growing and consistently having blooms. A few options for selling your flowers include: posting them in Facebook Marketplace, selling directly to florists. farmers markets, or setting up a retail space on your property where customers can purchase bouquets and arrangements directly from you.
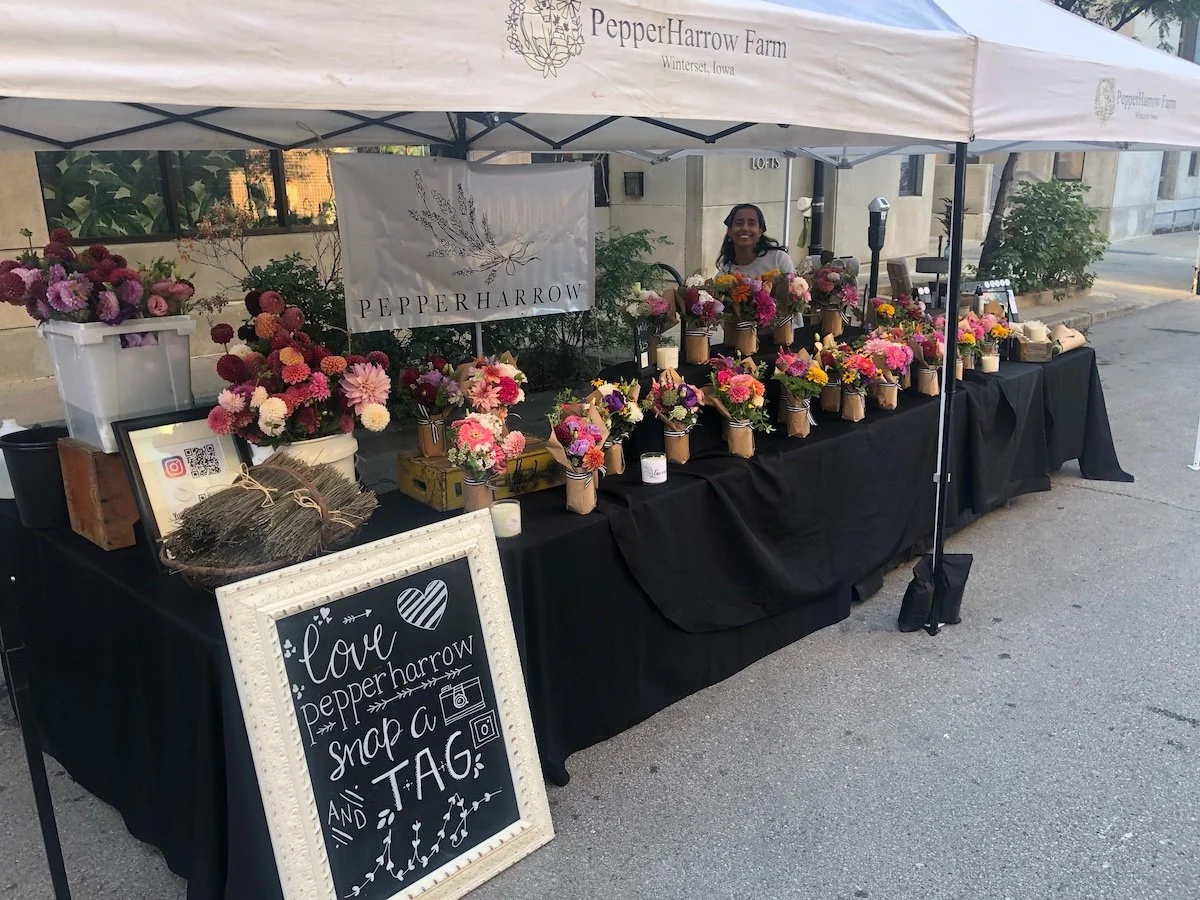
Recommendations: Try different ways out and see what works for you. Customers really nice presentation, so be sure to make the presentation to your flowers visually pleasing. Below is our Farmer’s Market stand. We like a white tent because it’s light and you can see the flowers without a tint. The black table cloths makes the flowers standout and we love how we present our bouquets in wrapped jars. You can access our e-course on how we do this wrapping process here.
Starting a flower farm can be a challenging but rewarding opportunity. We hope that by following these steps and taking note of some of our suggestions that you can turn your passion for growing flowers into a successful business in 2023!
XX Jenn and Adam