Creating a Dried Flower Wall
In 2022, we brought the beauty of dried flowers to life with a mesmerizing Gomphrena wall at PepperHarrow Farm in Central Iowa. Guests marveled at the unique Audray Bicolor Rose variety, capturing attention with its vivid color and distinctive globe blooms. From easy cultivation to efficient harvesting and drying, discover our step-by-step guide to recreate this enchanting installation using cost-effective jute rope. Join us in the world of Gomphrena, and let your creativity bloom! 🌸✨ #DriedFlowers #Gomphrena #FloralInspiration
Dried flowers have increased in popularity over the last several several years and the next few years promise to be no different.
Recognizing the growing trend of dried flowers across the globe, in 2022, we grew several flower varieties simply to set aside to dry in order to create several new dried floral installations on the farm, including a stunning dried flower wall in our new event barn.
The dried flower wall was an instant hit with guests visiting the farm. Guests would use the dried flower wall to take photos for a selfie opportunity, simply were inspired and enjoyed the beauty of it, and often asked and were inspired to attempt to dry flowers on their own. The wall was a conversation starter that grabbed the attention with anyone visiting!
So what flowers did we dry to create this beautiful installation? There are many different types of flowers that we LOVE for drying, which we’ll cover in a different post, but our most favorite flower for drying is Gomphrena (Globe Amaranth). These beautiful flowers are true to name and have little globe blooms on top of long, tall stems. Not only is their color extremely vivid, fresh or dried, but their unique shape and texture makes them a fun, tactile flower to dry. People cannot help themselves from reaching out to touch these beautiful blooms and often remark that they cannot believe they’re real. Fresh or dried, they look the same color either way. Just incredible!
The variety of Gomphrena we chose for our dried flower wall is called Audray Bicolor Rose. This unique shade of pink has a muted tone that isn’t too bright and bold for our muted space. The color looks perfect against our white board and batten wall in our event space. The perfect pop of color!

Growing, Bundling & Drying Gomphrena

In the garden
Growing Gomphrena is pretty easy to grow, starting from seed. It’s one of the easier annuals we grow each year at the farm.
To start, we plant 10 trays of 72 cells of plants, then we plant them out in a 100’ row. We planted this amount to really make the huge visual impact we were looking for with our dried flower wall.
Planting in rows is an efficient way to help plant, manage, maintain, and harvest these flowers for our production purposes.

Harvest
Gomphrena is harvested out of the cut flower garden at the peak of the bloom, meaning that we wait until the bloom has reached a mature stage in the bloom cycle, but not too far gone where it would begin to drop their seed.
Once the Gomphrena is harvested from the garden, we remove all of the foliage from the blooms and make bundles of about 40 stems of these flowers, keeping all of the blooms at the same length. Once they are in the bundle together, we use a stem chopper to cut the bottom of the stems to make them the same length for a clean look. From there, we take a rubber band and put it around the bundle to keep them in place and use a paperclip to hang the bundle from the waxed jute on the wall.
The bundles of Gomphrena take about 2 weeks to dry, but this will be dependent on the temperature of the space you have them drying. It’s important to have good airflow (we ran a fan in front of them), and to keep your flowers out of direct sunlight. The direct sun can fade the color on your flowers quite quickly. Typically the warmer and drier your space is, the quicker your flowers will dry. Cool and moist conditions will take a bit longer to dry your flowers.
How to Make a Dried Flower Wall
The flower wall was started initially with thin metal chain link, but after we finished out two of the rows we were planning on, we ran out, and it was pretty expensive to buy more material. Adam found a great substitute and changed to a nice, light weight jute rope that ended up looking great and worked perfectly. You can find the jute roping here.
We hung the jute rope from screws that we put on either end, the length of the flower wall. The jute was knotted on each screw, pulled taut. As you start hanging the Gomphrena bundles, they will dip down in the middle due to the weight. Pulling taut will make sure that each row doesn’t bow too much.
The flower wall started first with just 3 rows of roping with 40 bundles on each row. Once we started adding the bundles, we ended up adding a 4th row, because of the sheer volume of dried flower bundles we had to work with and because the wall ended up looking a even better with another row of Gomphrena.
From there, we hung the bundles off of the jute with the paperclips, which was a cost effective and easy way to manage the process. For the most part, the paperclip blended into the whole scene and you really couldn’t see it, because of the impact of the entire scene.
We hope we’ve inspired you to try something new next season at your home. Whether that’s simply trying to grow Gomphrena as a new flower in your garden, trying to dry a few flowers to keep and enjoy, or creating your own dried flower wall installation for a little bit larger project!
XX Jenn and Adam

Rainbow Wreath Making
Our beloved rainbow wreaths, adorned with dried flowers in every color, have become a holiday sensation. Inspired by a guest at a wreath-making workshop, these vibrant creations infuse cheer into the season. The process starts in summer, with carefully dried flowers representing each color of the rainbow. From yellow statice to blue saliva, each wreath is a masterpiece, adding a modern and festive touch to your holiday decor. Will you join the colorful tradition? 🌈✨ #RainbowWreaths #HolidayDecor #FloralMagic
Our signature rainbow wreaths have been increasingly popular year over year.
Dried flowers in every color of the rainbow laid upon a nest of fresh evergreens, it really makes those beautiful rainbow colors pop and it smells sooo good! Where did the idea for the rainbow wreath come from? The original idea came from a guest at a wreath making workshop three years ago. She started using dried flowers in various, more random colors in her wreath. They were clustered together, which made the colors pop even more. I took one look at it and it instantly dawned on me that I could use my dried flowers to make an extraordinary rainbow colored wreath. A day or two after the class, I raced to the shop to try and see if I could make my own creation. Sure enough, the rainbow wreath idea turned out perfectly and looked absolutely stunning!

Jenn holds a rainbow wreath in the lavender field with her dog chewy
How do we make the rainbow wreaths? Well, the process starts in the summer when we set aside time to cut fresh flowers for drying, specifically to make the rainbow wreaths. We take an hour each week, usually at the end of the day to go out and cut flowers in bunches of 10 to bring back to hang in our shop.
The flowers usually take around 10 days to dry in our shop area, but they’re stored in there for a few months before we end up using them in the wreaths. Any extra dried flowers are sold at farmer’s market, at specialty shops or in our own farm store.
As you can see, we use the colors of the rainbow. The flowers and citrus included in the wreath are as follows: yellow statice, yellow marigolds, yellow yarrow, orange slices, orange marigolds, red gomphrena, winterberry, dark purple/wine celosia, burgundy Chester Copperpot celosia, purple statice, dark blue larkspur, blue saliva, ruscus, and seeded eucalyptus.
Sometimes these ingredients vary and I’ll use other things to sub in for color, or I’ll only use 1 red item for example, so you can be flexible with what you use for your recipe and how you do your bunches. There’s lots of creative liberties you can take when putting one together.

Rainbow Wreath
What do you think about the rainbow wreath? Worth the hype? Are you encouraged to try to make one of your own? They’re sure to add a modern, cheery touch to the holiday season!
XX Jenn
PepperHarrow's 10 Year Anniversary!
Celebrating a decade of PepperHarrow Farm, our journey has been a tapestry of triumphs and challenges, fostering growth not just in blooms but in ourselves and our connection. Owning a small business has its hurdles, but the joy of cultivating the most beautiful local flowers in Central Iowa makes it all worthwhile. Our 10-year celebration was a surreal moment, shared with cherished customers. Treating them to complimentary delights and letting them craft their bouquets in our fields was a heartfelt gesture. The festivities also doubled as a fundraiser for the new Madison County Conservation center, emphasizing our commitment to community and nature. Cheers to the past, present, and future of PepperHarrow Farm! 🌸🎉
IT’S BEEN A WONDERFUL 10 YEARS ON THE FLOWER FARM.
We’ve had so many success and failures over the last 10 years. It’s been full of learning and growing - of our land, flowers, and most importantly, in ourselves and our relationship. At times it hasn’t been an easy endeavor, but the reward of owning our own business, creating success, and growing the most gorgeous local flowers in Central Iowa has been worth all of it 1000X over.

Cute Celebratory Boards by @CakeDSM
Celebrating 10 years of owning a small business is pretty surreal. We high-fived, and celebrated this huge milestone, but we also found ourselves completely taken aback that it had been 10 years. It’s funny how the years seem to blend together and how 10 years ago almost feels like a yesterday.
We celebrated our special night with over 125 of our most favorite customers, they are the folks that have supported us and enabled us to hit this huge milestone. It’s with their support, encouragement, and love of our small business that has helped us build our dream into a reality! Okay, totally gushing over our customers, but y’all get the point. They’re the most wonderful peeps and have treated us so well over the years. Because of this, we treated everyone who came out to complimentary food, beverages, ice cream, and of course FLOWER BOUQUETS!
Yep, that’s right! We sent them out into our flower fields to cut their own bouquets to take home as a small token of our appreciation for them. It was the absolute BEST to see everyone enjoy themselves so much and to also see the beautiful bouquets they created. It was a hit with our Friends of PepperHarrow and something we’d like to treat our best customers to every few years.


Photo Courtesy of CakeDSM
Our 10 year anniversary celebration was not only to celebrate the farm, but we also held it in support of our local Madison County Conservation, who is building a new conservation center at Pammel Park. If you missed out on the opportunity to contribute, you can do so by scanning the PayPal QR code, below to make a donation. Or, you can send payments on PayPal via email address to: naturalist@madisoncountyparks.org
All proceeds will go directly to the conservation center as well as other nature enrichment activities for an outdoor classroom space. Next time you visit Madison County, check out some our treasured parks. You can get a list of them here.

Thank you so much for helping us celebrate 10 years and here’s to another wonderful 10 years of success to come! We can’t wait to share more of our flower farming journey with all of you, as well as more exciting announcements to come.
XX Jenn and Adam

Growing Lavender in the Midwest
Three years ago, the idea of half an acre of lavender blooming seemed dreamy and far-fetched. Despite harsh Iowa conditions, including tough winters and hot, humid summers, our lavender fields flourished in their second growing season. We indulged in a month-long harvest, hosting photography sessions amidst the lavender. From mocktail classes to online courses, we embraced lavender experiences. Our expanded product line, including lavender sugar, salve, and soy candles, became a labor of love. Grateful for the support of friends, our products are set to launch online on 9/25/20—ready to share the joy of lavender with all.
Growing Lavender in the Midwest and Loving it!
If you had told me we would have 1/2 an acre of lavender blooming at any point 3 years ago, I would have thought it was an amazing idea, but it would have sounded completely far-fetched annnnd completely dreamy.
I’d spent 4 solid years testing out planting methods, testing my own theories about how to grow successfully, and making some accidental discoveries about growing lavender in the harsh growing conditions here in Zone 5b, Central Iowa. It was mostly observation and those ‘happy accidents’ that propelled us so far forward with enabling success. Crazy, right!?
Lavender prefers a more mild climate, with poor soil, neither of these Iowa has for the most part. Our winters are tough, getting incredible cold and conversely, our summers are crazy hot with extremely high humidity, which lavender plants dislike immensely.

But here we are, into our second growing season with lavender, reaping a bounty of blooms! Also, as we head into Fall, we’re even getting a small out of a second bloom on our plants, which has been nice for wedding work and to use for a few additional products.
Our fields yielded so many blooms, we spent nearly a solid month and a half cutting all the blooms, almost daily, into our workshop for small batch hand crafted distillation and bud drying (for dried bunches and sachets).
We enjoyed every moment of it an also enjoyed sharing it with photographers who brought out so many of their clients. We were booked solid each evening for a month and a half with newly engaged couples, families, and senior photo session.
Just incredible to get to share the lavender field with folks and to get to see the amazing photos. Check out this amazing blog post with some additional photos by Stephanie Daggett, here. It makes my heart happy to see such beauty, captured and shared with others to enjoy. So beautiful!

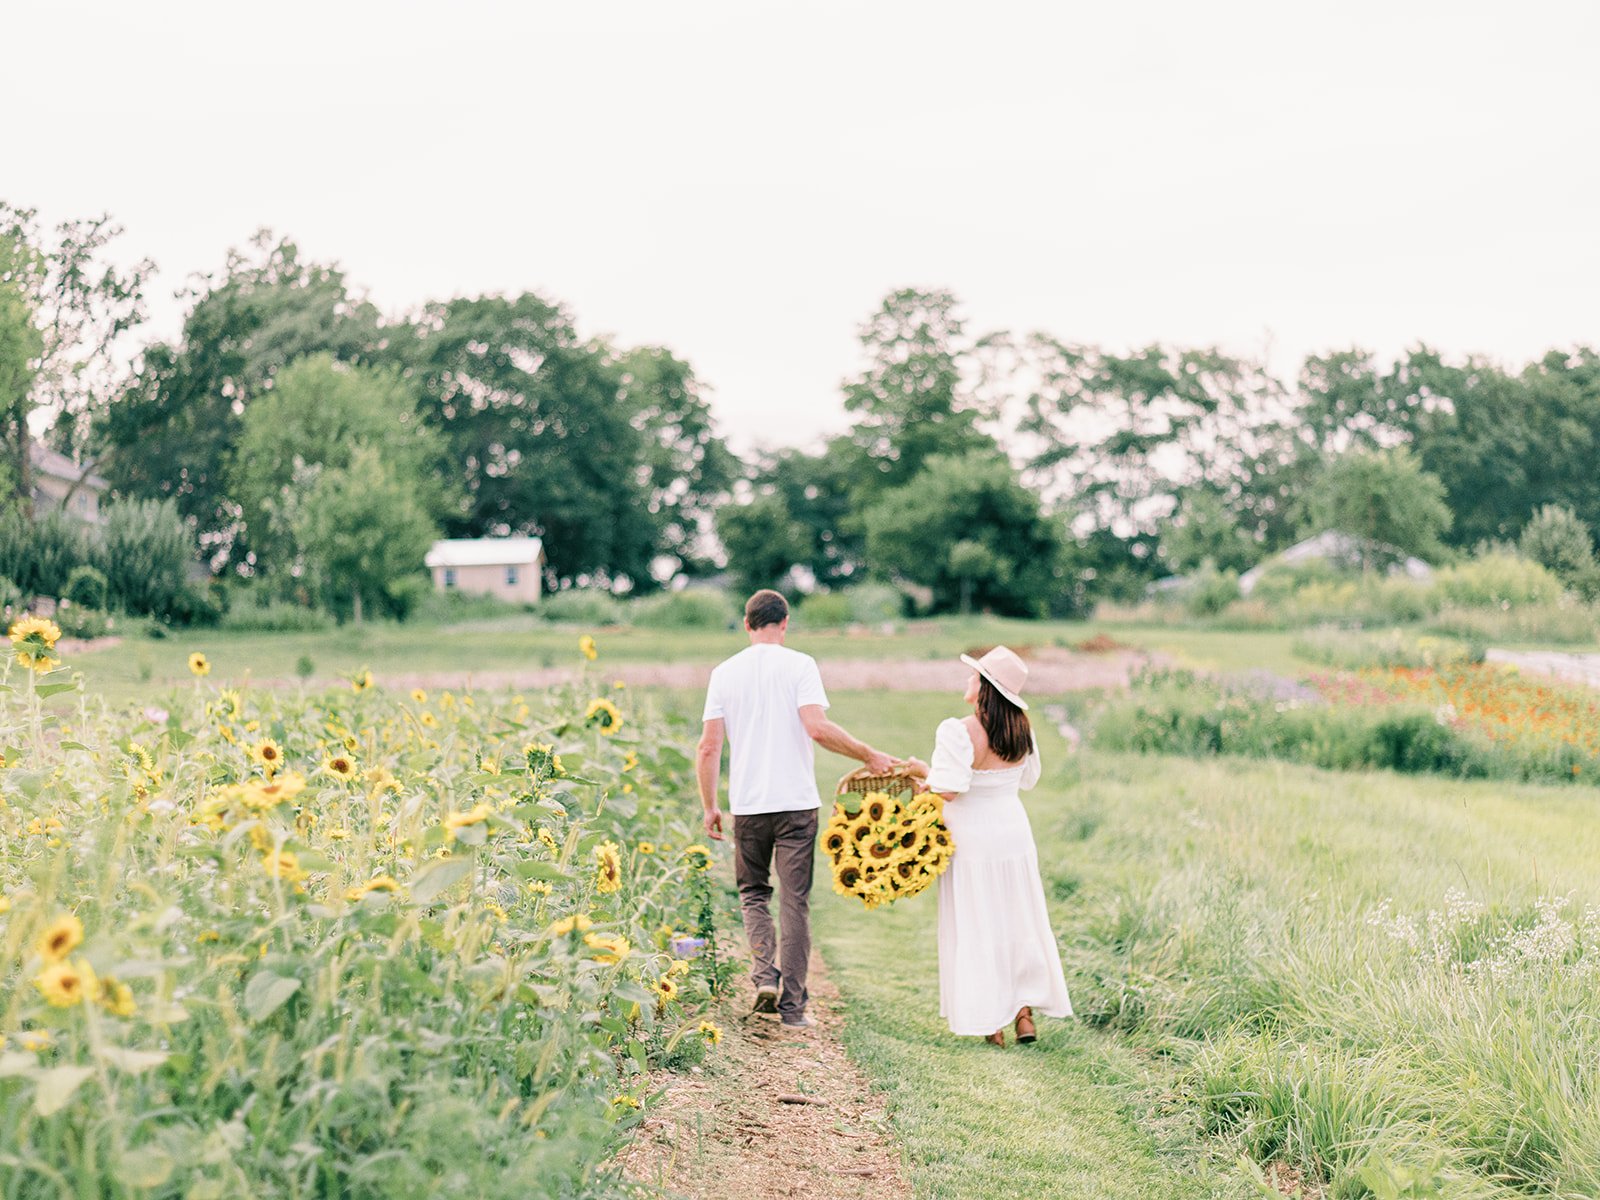
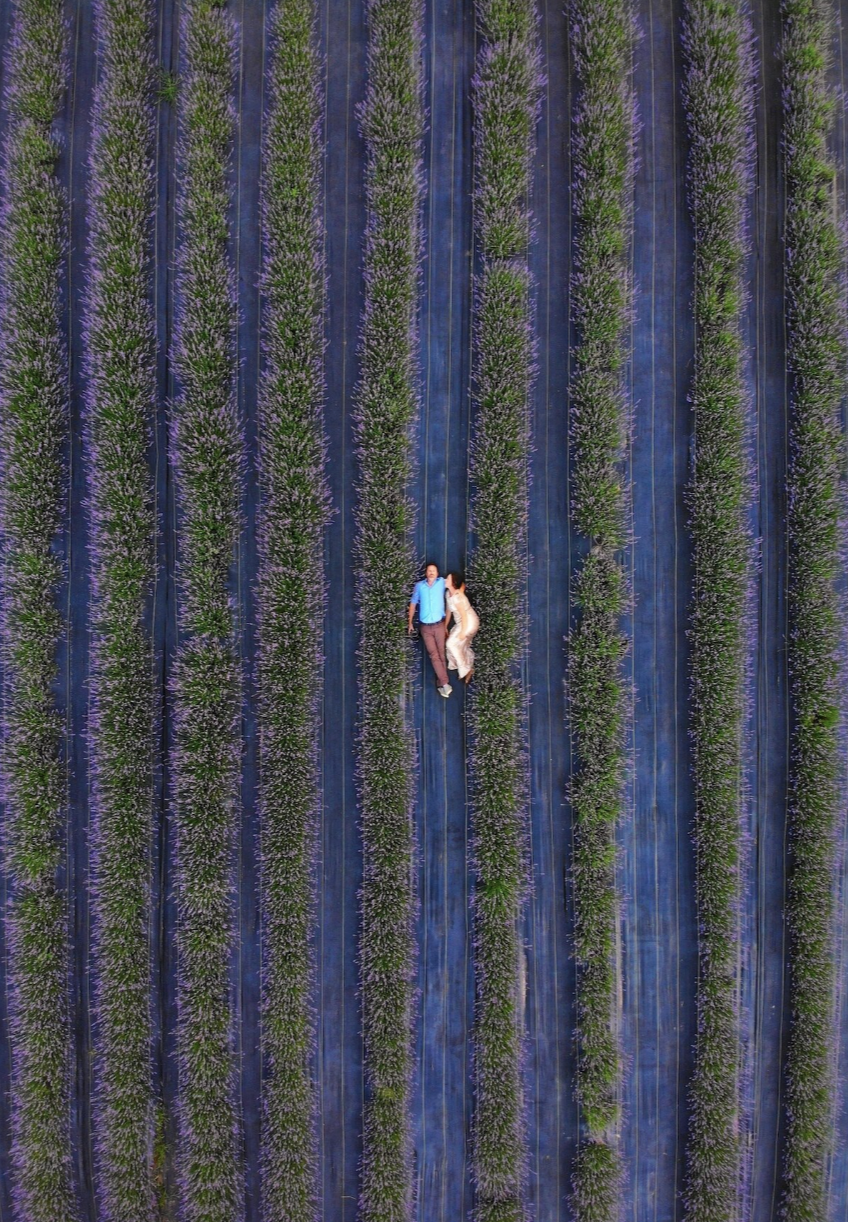
Adam even had fun with taking photos, breaking out his electronic ‘toy’, his new drone, to take a few photos of us in the lavender. Gotta say, that drone really takes some amazing photos!

We added so many classes, classes, classes! Everything from mocktail making with lavender simple syrup with Jeff Naples, the Beard Behind the Bar, to lavender distillation. You name it, we tried it this year with great success. Look for a whole line-up of farm experiences based around lavender next year.
We so enjoyed having so many out to the farm to share our knowledge. We love getting to meet new people who share our excitement and love of plants.
Not only did we hold on-farm classes, but we also launched our first ever online course on growing lavender. We weren’t sure online learning was going to be something people were interested in, but we were oh so wrong. It’s been super popular!
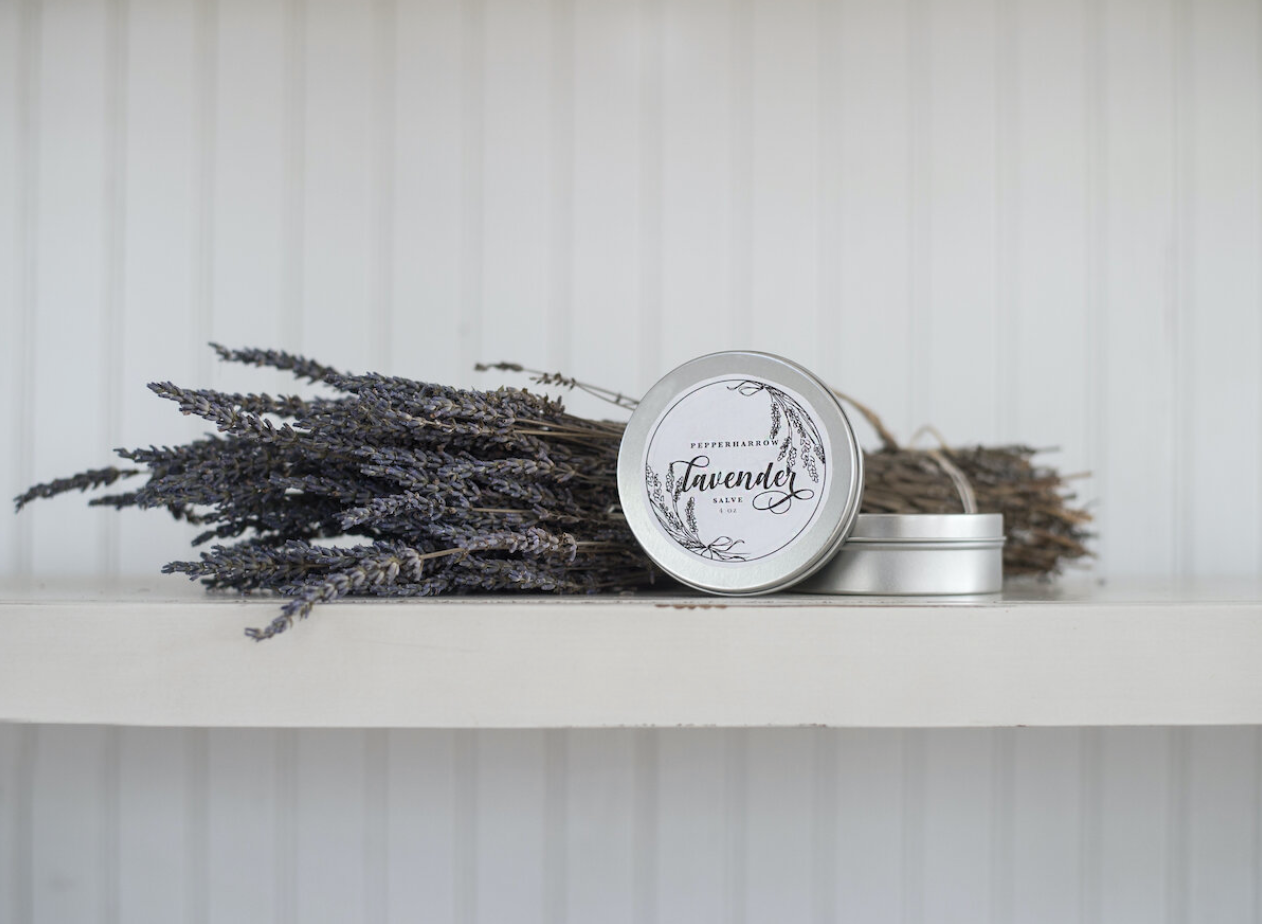
The final offering we’ve centered around lavender is our lavender products, which I kind of talked briefly about in the beginning.
We spent so long, lovingly making each of these products on a small scale, by hand. It’s truly been a labor of love brining these lavender products to market and was a huge undertaking. I had no idea what we were getting ourselves into when we decided to expand out our lavender product offering beyond essential oil and hydrosol. Whooowee!
This year, we expanded our lavender products to include: lavender sugar, salve, bath salts, wreaths, and sachets. They’ve been really popular so far and I’m excited to be adding even more new items next year. I’m especially excited about our lavender candles! They’re absolutely incredible! They burn clean, have an amazing fragrance and burn for a really long time.
We’re thankful for the help of our amazing friend Keelia from K Henri Design for creating our packaging and also to Dani at Sugar Hill Photography for the wonderful product images. We couldn't have done any of these without these terrific gals.
Picture by Sugar Hill Photography
So, are you ready to try to grow some lavender or sample some of our amazing products? We’ll have all of our amazing products online and available to the general public on 9/25/20. We can’t wait to share them with you, and for you all to share them with your loved ones.
XX Jenn
Forcing Blooming Flower Bulbs
Forcing vibrant spring blooms, including tulips, daffodils, and hyacinths, is a simple and rewarding project. This year's success involved intentional potting, minimal watering, and the necessary chilling period. Bulbs, potted in clay pots with pea gravel for drainage and adorned with Spanish moss, thrived with regular but light watering. Replicating this process for tulips, including a fringed mix, brought delightful results, making it an ideal project for both seasoned gardeners and first-timers, offering a burst of color and joy.
What’s Better Than Spring Blooms?
Gorgeous, scented, vibrant, cheery spring blooms from bulbs. You know who they are! Tulips, daffodils, hyacinth, grape hyacinth. All the pretties! Could there be anything better? The have wonderful fragrance and when cut in a mixed bouquet, look like something from a Dutch still life painting…swoon.

For the last two years, we’ve experimented with forcing spring blooming bulbs. I’ll be totally honest, last year was a total flop. It was a good try, but I didn’t do it right. I brought in bulbs early spring, plopped them into pots and watered away. They did sprout, but they didn’t perform like I needed them to and ended up totally failing. What a bummer! Well, this year, I learned the correct way to do this and now have loads of forced blooms to share with my friends, family and customers. I’m totally excited to add some cheer into people’s lives, especially right now with all of the isolation and social distancing happening. They’re a sure way to add some cheer.

Gorgeous rustic terra-cotta pots with forced hyacinth.
Crating: this year, instead of pulling bulbs out at the last moment, I intentionally potted them up in crates when they arrived in early November. I added a layer of dirt (about 5 inches deep) and gently pressed the bulbs into the dirt, leaving the top of the bulb exposed—I didn’t cover with dirt.
Watering: bulbs actually take a minimal amount of water. I maybe watered lightly every month. If the bulbs become too wet, they will rot. I did have a few hyacinth bulbs that ended up rotting. I took them out as soon as I saw it and tossed them in the compost pile.
Temperature: bulbs must be kept cold until you’re ready to allow them to bloom out. We kept out bulbs in our minimally heated shop space, near the front door (for extra cold). The space was kept around 40 degrees all winter long and this was enough to give the bulbs the ‘chill’ period they need in order to be force. They have to be kept at this temperature for at least 12-16 weeks. Our were actually in the chill stage from November through March, so much longer than needed; however, if I had wanted to pull them out earlier, I could have done that.
Potting: bulbs were placed in a deep clay pot. I placed about an inch and a half of pea gravel in the bottom, because the pots I used didn’t have holes in the bottom. This gives the water a resting place without the roots becoming too water logged. On top of the pea gravel, I placed about two inches of dirt, then added the bulb, roots down, into the dirt, filling in dirt around the remainder of the bulb. Water them in, lightly. On the top, I placed Spanish moss (shown above) and a tag from the farm. Voila!
Care Advice: water once a week, but not heavily. These bulbs don’t need a ton of water to produce their gorgeous blooms and we want to make sure that the roots don’t sit in water.

I also copied this same process for tulips, daffodils and grape hyacinth. Since the tulips are smaller, I added four bulbs into a shallow pot, again putting pea gravel at the bottom for drainage, and added a bit of pea gravel and Spanish moss on top. The tulips are pretty special, because they’re a fringed mix, which everyone absolutely goes gaga for. They’re just gorgeous!

If you’ve never tried to force bulbs before, I highly suggest it, even if you have failed in the past, like me. It was fun and encouraging to give it another go, seeing success this round. If you’re a first time gardener, you should also try this at home. It’s a simple process and you can find any of these bulbs at your local nurseries, and/or hardware stores in the fall.
Get Growing!
XX Jenn